
How To Add Customer Attributes Programmatically In Magento 2
Magento 2 provides a lot of flexibility in terms of customizing customer attribute. You can add new attributes or modify the existing ones based on your requirements. In this article, we’ll discuss how to add customer attributes programmatically in Magento 2.
Steps to create customer attribute in Magento 2
- Create a Module
- Create Customer Attribute
- Run Commands
- Test Customer Attribute
Create a Module in Magento 2
In the previous article, we discussed in detail to create a custom module in Magento 2.
Create Customer Attribute In Magento 2
Now Magento 2 introduce a new method (Data Patches) to create custom attributes. We will use Data patches to add the custom customer attribute to the database. Create a class named CustomerAttributes.php in the following directory.
Directory
app/code/GDBlogger/DemoModule/Setup/Patch/Data/CustomerAttributes.php
Code of CustomerAttributes.php
<?php
namespace GDBlogger\DemoModule\Setup\Patch\Data;

use Magento\Customer\Model\Customer;
use Magento\Eav\Model\Config;
use Magento\Customer\Setup\CustomerSetupFactory;
use Magento\Framework\Setup\ModuleDataSetupInterface;
use Magento\Framework\Setup\Patch\DataPatchInterface;

class CustomerAttributes implements DataPatchInterface
{
    /**
     * @var CustomerSetupFactory
     */
    private $customerSetupFactory;

    /**
     * @var ModuleDataSetupInterface
     */
    private $setup;

    /**
     * @var Config
     */
    private $eavConfig;

    /**
     * AccountPurposeCustomerAttribute constructor.
     * @param ModuleDataSetupInterface $setup
     * @param Config $eavConfig
     * @param CustomerSetupFactory $customerSetupFactory
     */
    public function __construct(
        ModuleDataSetupInterface $setup,
        Config $eavConfig,
        CustomerSetupFactory $customerSetupFactory
    )
    {
        $this->customerSetupFactory = $customerSetupFactory;
        $this->setup = $setup;
        $this->eavConfig = $eavConfig;
    }

    /** We'll add our customer attribute here */
    public function apply()
    {
        $customerSetup = $this->customerSetupFactory->create(['setup' => $this->setup]);
        $customerEntity = $customerSetup->getEavConfig()->getEntityType(Customer::ENTITY);
        $attributeSetId = $customerSetup->getDefaultAttributeSetId($customerEntity->getEntityTypeId());
        $attributeGroup = $customerSetup->getDefaultAttributeGroupId($customerEntity->getEntityTypeId(), $attributeSetId);
        $customerSetup->addAttribute(Customer::ENTITY, 'new_attribute', [
            'type' => 'text',
            'input' => 'text',
            'label' => 'New Attribute',
            'required' => true,
            'default' => 0,
            'visible' => true,
            'user_defined' => true,
            'system' => false,
            'is_visible_in_grid' => true,
            'is_used_in_grid' => true,
            'is_filterable_in_grid' => true,
            'is_searchable_in_grid' => true,
            'position' => 300
        ]);
        $newAttribute = $this->eavConfig->getAttribute(Customer::ENTITY, 'new_attribute');
        $newAttribute->addData([
            'used_in_forms' => ['adminhtml_checkout','adminhtml_customer','customer_account_edit','customer_account_create'],
            'attribute_set_id' => $attributeSetId,
            'attribute_group_id' => $attributeGroup
        ]);
        $newAttribute->save();
    }

    public static function getDependencies()
    {
        return [];
    }

    public function getAliases()
    {
        return [];
    }
}
- The namespace
GDBlogger\DemoModule\Setup\Patch\Dataindicates the module and directory where the patch file is located. - The
usestatements import required classes for the patch. - The class
AccountPurposeCustomerAttributeimplementsDataPatchInterfaceand contains the logic to add the custom attribute. - The
apply()the method is called when the patch is executed, and it creates a new customer attribute using theaddAttribute()method of the customer setup object. The attribute is assigned a type oftext, input type oftext, label ofNew Attribute, and other options likerequired,default,visible, etc. These options define the behaviour of the attribute on the front end and back end of the Magento store. - After creating the attribute, the
$newAttributethe variable is used to retrieve the newly created attribute from the database using thegetAttribute()method of theConfigclass. - The attribute is then assigned to specific attribute sets and groups using the
addData()method of the$newAttributeobject. Theused_in_formsthe option specifies where the attribute is used in the customer edit and registration forms, and theattribute_set_idandattribute_group_idoptions specify the attribute set and group where the attribute is added. - Finally, the
$newAttributethe object is saved using thesave()method.
The getDependencies() and getAliases() methods are used to define dependencies and aliases for the data patch. In this case, there are no dependencies or aliases defined.
Run Commands
After adding the Data Patch for custom attributes. Now you need to run the following commands to add the attribute to the database.
Run setup upgrade
Php bin/magento setup:upgrdae
This command will update the database data and add the attribute to the database.
Clear cache
Now you need to clear the Magento 2 cache. After you clear the cache, Magento 2 should add your custom attribute to the customer.
Php bin/magento cache:clean
If you still haven’t created the attribute, you can run the below commands and check again.
Php bin/magento setup:di:compile
Php bin/magento setup:static-content:deploy
Php bin/magento indexer:reindex
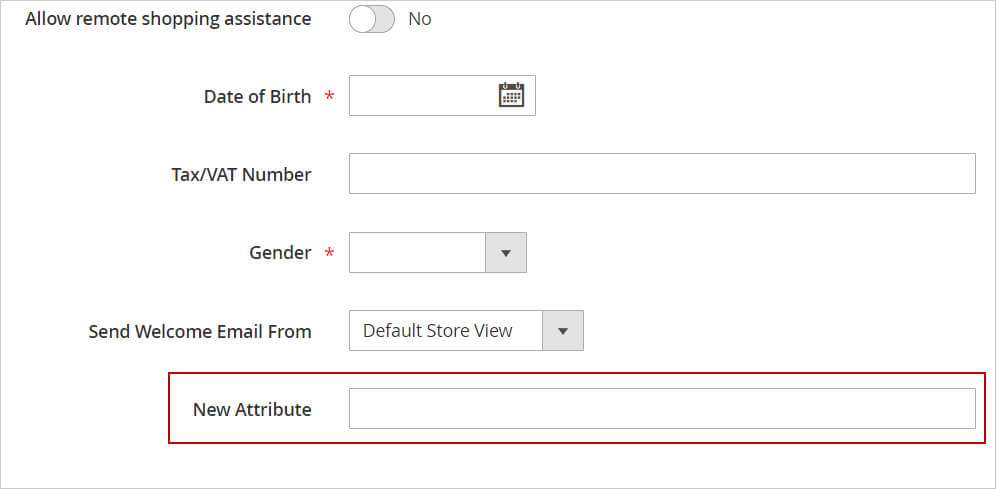
Test Customer Attribute
In your Magento 2 admin,
- Open the Customer > All Customer.
- Click on the Add New Customer button.
- You can see that Magento 2 has created your custom attribute (New Attribute) here.
I hope this guide will be helpful to you. Please do not hesitate to contact us through the comments section if you have any further questions.

