
How to Create Category Attribute Programmatically in Magento 2
Adding category attributes programmatically in Magento 2 can be helpful if you need to extend the default category attributes or create custom attributes for specific business needs. In this guide, we will walk you through the process to create a category attribute programmatically in Magento 2.
Steps to create category attribute in Magento 2
- Create a Module
- Create the category attribute
- Create category form
- Run commands
- Test Category Attribute
Create a Module in Magento 2
In the previous article, we discussed in detail to create a custom module in Magento 2.
Create the Category Attribute In Magento 2
Now Magento 2 introduce a new method (Data Patches) to create custom category attributes. We will use Data patches to add the custom category attribute to the database. Create a class named CategoryAttributes.php in the following directory.
Directory
app/code/GDBlogger/DemoModule/Setup/Patch/Data/CategoryAttributes.php
Code of CategoryAttriutes.php
<?php
declare (strict_types = 1);

namespace GDBlogger\DemoModule\Setup\Patch\Data;

use Magento\Eav\Model\Entity\Attribute\ScopedAttributeInterface;
use Magento\Eav\Setup\EavSetup;
use Magento\Eav\Setup\EavSetupFactory;
use Magento\Framework\Setup\ModuleDataSetupInterface;
use Magento\Framework\Setup\Patch\DataPatchInterface;
use Magento\Catalog\Model\Category;

class CategoryAttributes implements DataPatchInterface {

    /**
     * ModuleDataSetupInterface
     *
     * @var ModuleDataSetupInterface     */
    private $moduleDataSetup;

    /**
     * EavSetupFactory
     *
     * @var EavSetupFactory
     */
    private $eavSetupFactory;

    /**
     * @param ModuleDataSetupInterface $moduleDataSetup
     * @param EavSetupFactory          $eavSetupFactory
     */
    public function __construct(
        ModuleDataSetupInterface $moduleDataSetup,
        EavSetupFactory $eavSetupFactory
    ) {
        $this->moduleDataSetup = $moduleDataSetup;
        $this->eavSetupFactory = $eavSetupFactory;
    }

    /**
     * {@inheritdoc}
     */
    public function apply() {
        /** @var EavSetup $eavSetup */
        $eavSetup = $this->eavSetupFactory->create(['setup' => $this->moduleDataSetup]);
        $eavSetup->addAttribute(Category::ENTITY, 'custom_category_attr', [
            'type' => 'text',
            'label' => 'Custom Category Attribute',
            'input' => 'text',
            'default' => 0,
            'sort_order' => 5,
            'global' => ScopedAttributeInterface::SCOPE_STORE,
            'group' => 'General Information',
            'visible_on_front' => true
        ]);
    }

    /**
     * {@inheritdoc}
     */
    public static function getDependencies() {
        return [];
    }

    /**
     * {@inheritdoc}
     */
    public function getAliases() {
        return [];
    }
}
- The code declares strict typing using the
declarethe statement, which enforces strict type-checking on the code. - The code defines a namespace for the class
CategoryAttributes. - The class
CategoryAttributesimplements theDataPatchInterfaceinterface, which is a standard interface in Magento 2 for defining data patches. - The class has two private properties,
$moduleDataSetupand$eavSetupFactory. These properties are injected through the constructor. - In the
apply()method, an instance EavSetup is created using the $eavSetupFactory object. The EavSetup object is used to add a new custom attribute to the category entity. The attribute is defined with various properties, such as its data type, label, input type, default value, and so on. - The
getDependencies()the method returns an empty array, indicating that this data patch has no dependencies on other data patches. - The
getAliases()the method returns an empty array, indicating that this data patch has no aliases.
Create Category Form In Magento 2
Now add the custom category attribute in category form. Create the category_form.xml in the module directory.
Directory
app/code/GDBlogger/DemoModule/view/adminhtml/ui_component/category_form.xml
Code of category_form.xml
<?xml version="1.0" ?>
<form xmlns:xsi="http://www.w3.org/2001/XMLSchema-instance"
xsi:noNamespaceSchemaLocation="urn:magento:module:Magento_Ui:etc/ui_configuration.xsd">
    <fieldset name="general">
        <field name="custom_category_attr">
            <argument name="data" xsi:type="array">
                <item name="config" xsi:type="array">
                    <item name="required" xsi:type="boolean">false</item>
                    <item name="validation" xsi:type="array">
                        <item name="required-entry" xsi:type="boolean">false</item>
                    </item>
                    <item name="sortOrder" xsi:type="number">100</item>
                    <item name="dataType" xsi:type="string">string</item>
                    <item name="formElement" xsi:type="string">input</item>
                    <item name="label" translate="true" xsi:type="string">Custom Category Attribute</item>
                </item>
            </argument>
        </field>
    </fieldset>
</form>
Run Commands
After completing the above steps, now you need to run the following commands to add the attribute to the database.
Run setup upgrade
Php bin/magento setup:upgrdae
This command will update the database data and add the attribute to the database.
Clear cache
Now you need to clear the Magento 2 cache. After you clear the cache, Magento 2 should add your custom attribute to the customer.
Php bin/magento cache:clean
If you still haven’t created the attribute, you can run the below commands and check again.
Php bin/magento setup:di:compile
Php bin/magento setup:static-content:deploy
Php bin/magento indexer:reindex
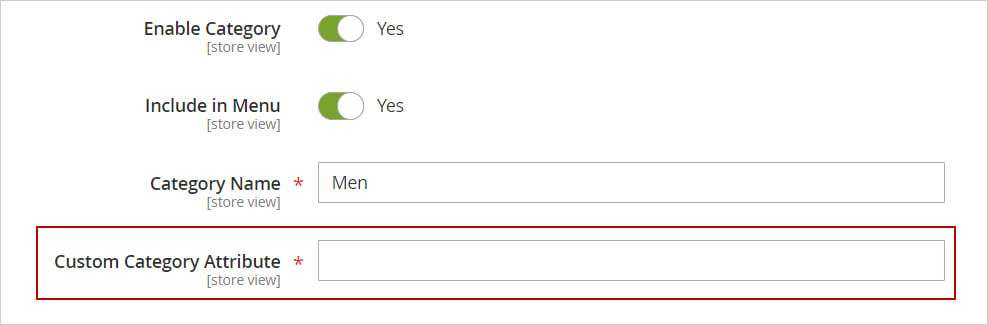
Test Product Attribute
In your Magento 2 admin,
- Open the Catalog > Category.
- You can see that Magento 2 has created your custom attribute here.
I hope this guide will be helpful to you. Please do not hesitate to contact us through the comments section if you have any further questions.

