
How To Create Command Line In Console CLI In Magento 2
Create a custom command line in the console CLI, console command line interface (CLI) is an essential tool for developers to interact with a web application. In Magento 2, CLI provides a way to manage and control the application through command lines. In this tutorial, we will guide you on how to create a custom command line in Console CLI in Magento 2.
Steps To Create Command Line In Console CLI
- Create Module
- Create command file
- Define command in di.xml
- Check Commands list
- Test Command
Create Module In Magento 2
In the previous article, we discussed in detail to create a custom module in Magento 2.
Create a Command file In Magento 2
Next, we need to create a command file that will contain the logic of our custom command. We can create a command file.
Directory
app/code/GDBlogger/DemoModule/Console/Command/GreetingCommand.php
Code of GreetingCommand.php
<?php
namespace GDBlogger\DemoModule\Console\Command;

use Symfony\Component\Console\Command\Command;
use Symfony\Component\Console\Input\InputInterface;
use Symfony\Component\Console\Output\OutputInterface;

class GreetingCommand extends Command
{
    protected function configure()
    {
        $this->setName('samplecommand:greetings')
             ->setDescription('Displays a greeting message');
        parent::configure();
    }

    protected function execute(InputInterface $input, OutputInterface $output)
    {
        $output->writeln('<info>Hello, Welcome to Magento 2 Custom Command Line!</info>');
    }
}
This is a PHP code block that defines a custom command for Magento 2’s Command Line Interface (CLI).
Here’s what each part of the code does:
namespace GDBlogger\DemoModule\Console\Command;– This line specifies the namespace for the custom command. Namespaces help to avoid naming conflicts between classes and functions.use Symfony\Component\Console\Command\Command;– This line imports theCommandclass from theSymfony\Component\Console\Commandnamespace. This class is the base class for all CLI commands in Symfony.use Symfony\Component\Console\Input\InputInterface;– This line imports theInputInterfaceclass from theSymfony\Component\Console\Inputnamespace. This class provides access to the input arguments and options passed to the command.use Symfony\Component\Console\Output\OutputInterface;– This line imports theOutputInterfaceclass from theSymfony\Component\Console\Outputnamespace. This class provides methods for outputting messages to the console.class GreetingCommand extends Command– This line defines a new class namedGreetingCommandthat extends theCommandclass from theSymfony\Component\Console\Commandnamespace.protected function configure()– This method is called during the configuration of the command. It sets the name and description of the command.$this->setName('samplecommand:greetings')– This line sets the name of the command tosamplecommand:greetings. The name is used to call the command from the CLI.setDescription('Displays a greeting message');– This line sets the description of the command that will be displayed when the--helpthe option is used.parent::configure();– This line calls theconfigure()method of the parent class.protected function execute(InputInterface $input, OutputInterface $output)– This method is called when the command is executed. It takes the input and output objects as arguments.$output->writeln('<info>Hello, Welcome to Magento 2 Custom Command Line!</info>');– This line outputs a message to the console using the$outputobject. The<info>tag is used to highlight the message.
Define command in di.xml
Now, we need to register the command in our module. We can do this by adding the command to the module’s di.xml file.
Directory
app/code/GDBlogger/DemoModule/etc/di.xml
Code of di.xml
<?xml version="1.0"?>
<config xmlns:xsi="http://www.w3.org/2001/XMLSchema-instance" xsi:noNamespaceSchemaLocation="urn:magento:framework:ObjectManager/etc/config.xsd">
   <type name="Magento\Framework\Console\CommandList">
       <arguments>
           <argument name="commands" xsi:type="array">
               <item name="greeting_command" xsi:type="object">GDBlogger\DemoModule\Console\Command</item>
           </argument>
       </arguments>
   </type>
</config>
Check Commands List
After you create the command file and di.xml, it is time to check the Magento 2 command list to confirm the successful registration of your custom-created command.
Run the following command to check the list of all commands in Magento 2:
Php bin/magento
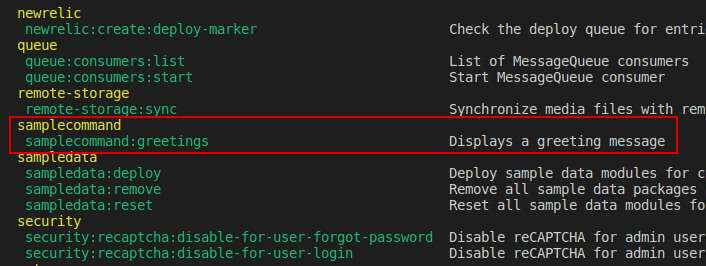
After running this command, you will get this result and here you can also see your custom-created command.
Test Command
Now, run the following command to test your custom-created command.
Php bin/magento samplecommand:greetings
Result:
Hello, Welcome to Magento 2 Custom Command Line!
I hope this guide will be helpful to you. Please do not hesitate to contact us through the comments section if you have any further questions.

